Antenna Installation Guide For Helium
Over the past few weeks, I have been mapping the Helium Network to determine coverage, which has given me some insight into how the LORA spectrum (900 MHz in the states) works and propagates. I want to share with you some Antenna placement tips for the Helium Network that may help you out when installing your system. I don’t plan on covering what type of antenna you should purchase in this article (for brevity), so if you want to learn more stay tuned, I plan on making a write-up on that next.
Antenna Placement Is Paramount
There have been some whispers on Discord and other social media that the need for a good antenna is not required. That’s incorrect. Antenna placement is critical to earning you HNT and in extension, a healthy profit. In my travels, I saw far too many Miners placed inefficiently.
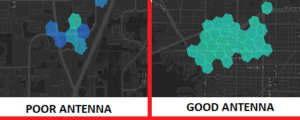
Figure 1 highlights the difference between poor antenna placement vs good antenna placement. I personally mapped these two locations myself. The two images show an overhead map of the signal strength of the area surrounding the miner. The pink dot is the location of the miner and the lighter the color, the stronger the signal. No highlighting means there is no coverage in the area. FYI, each Hex is about 1000′ ft in diameter.
The antenna on the left side of Figure 1 was on the first floor of an apartment complex inside a gated community. The antenna was located indoors on the first floor. In the case of this specific miner, they are missing out on lots of potential revenue.

On the right, the antenna was mounted on the 4th floor of a high rise building mounted on the east side of the building. This placement increased the range about 2.5 times greater than the installation on the left.
Of course, not everyone has access to a skyscraper to mount an antenna to, but there are simple things you can do to increase range. Here are some of the most important ones:
1) Mount the Antenna Outdoors
The single best way to increase the miner’s signal strength is to mount your antenna outdoors. RF waves propagate for long distances if they are unobstructed. Building materials like drywall, concrete, and wood will significantly impact signal strength. In fact for every wall RF has to penetrate, its energy can be reduced by up to half or more if it’s concrete.
2) The Higher the Antenna is Mounted the Better
A surefire way to reduce signal range is to mount your antenna low to the ground. Wireless signals travel farther the higher it is transmitted because there is simply less things that get in the way the higher up you go. Also, the earth operates as a great RF sink. If you live in a hilly location the RF signal will not penetrate through hills and valleys.
3) Use A Properly Sized and Terminated RF Cable
When connecting your miner to an antenna, it’s important that you size your cable for the distance you require for proper antenna placement. There are two factors that are required to determine what type of cable is needed. The first is the length, which would be the distance between your miner and the antenna. The second is the frequency that the antenna will be transmitting at. The higher the frequency, the higher the attenuation (loss). The Helium frequency operates in the 900mhz or in HAM speak the 33cm band.
DB Loss Chart
| Cable Type | DB Loss |
| RG-58 | 16.5 |
| RG-8X | 12.8 |
| LMR-240 | 7.6 |
| RG-213 | 8.0 |
| 9913 | 4.2 |
| LMR-400 | 3.9 |
| 3/8″ LDF | 3.4 |
| LMR-600 | 2.5 |
| 1/2″ LDF | 2.2 |
| 7/8″ LDF | 1.2 |
| 1 1/4″ LDF | 0.91 |
| 1 5/8 LDF | 0.77 |
Above is a chart that quantifies DB loss over a particular type of cable. Remember, DB is not a linear value, it’s logarithmic so an increase of 3db doubles its power. However, this is where a lot of people get confused. They often ask whether having a antenna is worth the loss associated with having a longer cable. The short answer is that it most definitely is worth the loss if doing so allows the antenna to be placed in a higher location or if it offers a better Line of Sight to the surrounding landscape.
The most commonly used cables are RG-58 and the LMR variants. If you decide to go with a thicker cable than LMR-240, it may be prudent to get the flexible type, these cables can be very stiff the thicker they are. In my setups, I often use LMR-400 cable for anything greater than 30 ft. When sizing your cable, the rule of thumb is a total loss no greater than 3db, although the smaller the better
Cable Termination
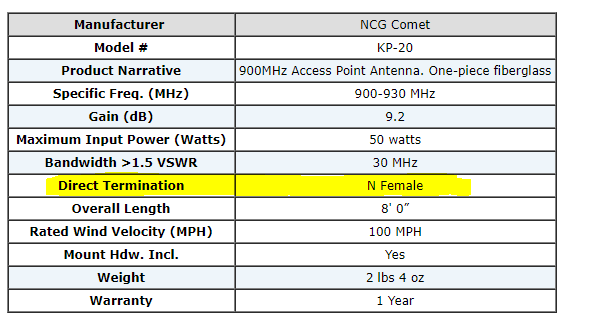
The Cable will need to be properly terminated on both sides to connect to the equipment. This all depends on the type of miner you own and the antenna you plan on connecting. The information should be readily accessible on the specifications of the devices. For example, this particular antenna has an N FEMALE connector, which means that you will need an N MALE connector on one end of your cable.
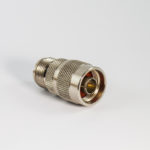
For example, the most popular miner today is the RAK Miner which uses a female RP-SMA connector. When sizing your cable you’ll need one that has a Type N Male connector on the antenna side and an RP-SMA Male Connector on the other. Of course, you may see something different too, but just check the spec sheet of the antenna for more information.
Where Do I Find a Cable That Fits My Needs?
So there are two ways to do this:
DIY Method
The first is the DIY method, where you buy the cable in bulk and then crimp or solder the ends yourself. I would not recommend doing this if it’s your first time or if you only need one cable. Proper cable termination techniques must be followed and amateurs are prone to making errors. A failure to properly terminate can introduce a loss in the system or worse could end up burning up your Miner’s RF amplifier. Also, it ends up being the same price as just buying a custom cable because of the tools required anyway.
Custom Cable Shop
The second way is to go to a custom cable shop and just order the exact cable required. It’s actually pretty cheap. You can purchase a good cable for about 40 dollars shipped. I am going to shamelessly namedrop here – although I’m not being paid just helping a local company I think does a good job – and recommend Air802. I’ve used them for quite a few different RF setups over the years and their quality is outstanding.
TL;DR

So, I hope I’ve made the point that antenna placement is absolutely critical to signal propagation. And in my experience, the majority of Helium Miners out there are not doing it right. You can see for yourself, check out the custom coverage map where users can upload their signal strength they get from various nodes. Most miners only getting 2-3 hexes of coverage, each hex is about 1,000 feet, which means that these miners are getting far less than the 10KM some have touted.
I partly blame Helium for this, they could do a better job educating people on the benefits of proper antenna placement. It also doesn’t help that the original Helium miner design looked like an appliance that should be set next to your computer desk which is the absolute worst place to mount a miner. So if you really want the extra HNT, mount your antenna using proper procedures.